Linux常用指令
- To turn off the monitor
$ xset dpms force off xset dpms force off/etc/init.d/ssh restartsystemctl enable ssh
Linux - 提供 SMB 檔案分享
https://ubuntu.com/tutorials/install-and-configure-samba#1-overview
2. Installing Samba
To install Samba, we run:
sudo apt update
sudo apt install samba
We can check if the installation was successful by running:
whereis samba
The following should be its output:
samba: /usr/sbin/samba /usr/lib/samba /etc/samba /usr/share/samba /usr/share/man/man7/samba.7.gz /usr/share/man/man8/samba.8.gz3. Setting up Samba
Now that Samba is installed, we need to create a directory for it to share:
mkdir /home/<username>/sambashare/
The command above creates a new folder sambashare in our home directory which we will share later.
The configuration file for Samba is located at /etc/samba/smb.conf. To add the new directory as a share, we edit the file by running:
sudo nano /etc/samba/smb.conf
At the bottom of the file, add the following lines:
[sambashare]
    comment = Samba on Ubuntu
    path = /home/username/sambashare
    read only = no
    browsable = yes
Then press Ctrl-O to save and Ctrl-X to exit from the nano text editor.
What we’ve just added
- comment: A brief description of the share.
path: The directory of our share.
read only: Permission to modify the contents of the share folder is only granted when the value of this directive is
no.browsable: When set to
yes, file managers such as Ubuntu’s default file manager will list this share under “Network” (it could also appear as browseable).
Now that we have our new share configured, save it and restart Samba for it to take effect:
sudo service smbd restart
Update the firewall rules to allow Samba traffic:
sudo ufw allow sambaDLNA
DLNA
https://thepiguy.altervista.org/how-to-install-minidlna-in-ubuntu/
To install, from Terminal enter:
sudo apt-get install minidlnaOnce installed you will need to edit the configuration file:
sudo nano /etc/minidlna.confGo to the section below and under the line ‘media_dir=/var/lib/minidlna’ add the path to your media.
Edit the following to point to your media shown as shown below.
- V stands for Video
- A stands for Audio
- P stands for Photos/pictures
# If you want to restrict a media_dir to a specific content type, you can
# prepend the directory name with a letter representing the type (A, P or V),
# followed by a comma, as so:
# * "A" for audio (eg. media_dir=A,/var/lib/minidlna/music)
# * "P" for pictures (eg. media_dir=P,/var/lib/minidlna/pictures)
# * "V" for video (eg. media_dir=V,/var/lib/minidlna/videos)
# * "PV" for pictures and video (eg. media_dir=PV,/var/lib/minidlna/digital_camera)
media_dir=/var/lib/minidlna
Now set friendly name entry for the media server:
friendly_name=MediaServerinotify autoupdates your library but does require resouces. If you do not use inotify you will need to restart or reload the miniDLNA service to refresh the library.
Enable Automatic Discovery of new media:
# Automatic discovery of new files in the media_dir directory.
inotify=yes
The rest of the settings can remain unchanged
Now restart MiniDLNA
sudo minidlnad -Rand reload the database
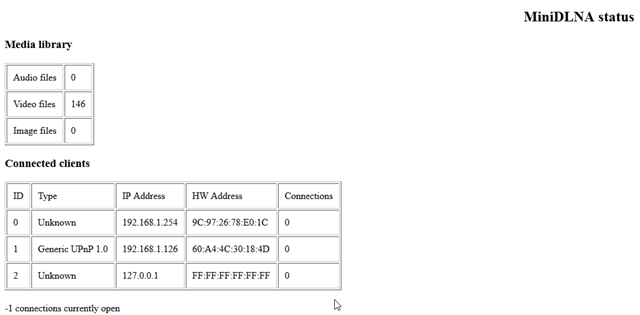
sudo service minidlna force-reloadIf you want to display the limited web interface status for MiniDLNA, open a web browser enter the servers ip address on port 8200
e.g. 192.168.0.100:8200
You will see something similar to the screen below:
在Ubuntu 18.04系统中启用SSH登录的方法
https://hackmd.io/@W855Yo-6R22n28iWVYZdVw/HJwUo8yzT
透過管理員身份執行
因為我們之後的操作都需要有超級管理員的身份權限,所以我們要透過執行以下指令。
sudo su -
輸入原先一般使用者的密碼。輸入成功,輸入指令的開頭會從原先的$轉變為#,代表成功將原本一般使用者切換為超級使用者。

更新 apt
因為我們需要透過apt的套件管理工具來安裝SSH所需套件,所以需要先來更新一下apt的套件資訊及列表,執行以下指令就可達成。
apt update
並且執行以下指令,更新已安裝的套件。
apt upgrade
以上畫面執行成功後,就可以來進行本文章的主題了(安裝SSH)。
確認網卡IP位址
執行以下指令就可查看。
ip a
根據結果可以看到我的IP是192.168.137.11。

安裝SSH
執行以下指令,安裝SSH套件,若無錯誤訊息,就代表安裝成功。
apt install openssh-server
設定SSH
將下來透過nano文字編輯器來修改SSH套件的一些參數,以利於正常運行。請執行以下指令進入編輯畫面。
nano /etc/ssh/sshd_config
將該文件其中三個參數,更改成下方內容。
Port 22 -> SSH使用的Port,建議不要改
PasswordAuthentication yes
PermitRootLogin yes -> 是否開放 root 登入
改完記得儲存
重啟SSH
更改完參數後,必須重啟SSH服務,剛剛調的參數才能被套用。請執行以下指令
/etc/init.d/ssh restart
到這裡,已經成功將SSH服務架設完畢,接下來測試看看吧。
znFGBvSV7YcvGXVc4A6kc3eytMuZyg
Wi-Fi
您似乎嘗試安裝另一個驅動程序,該驅動程式將您的設備所需的驅動程式b43列入黑名單。讓我們糾正一下:
sudo rm /etc/modprobe.d/blacklist-bcm43.conf
sudo modprobe b43
您的無線網路現在應該可以運作了


沒有留言:
張貼留言